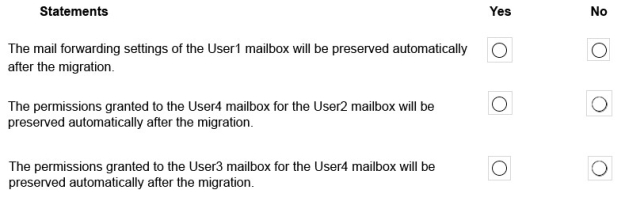
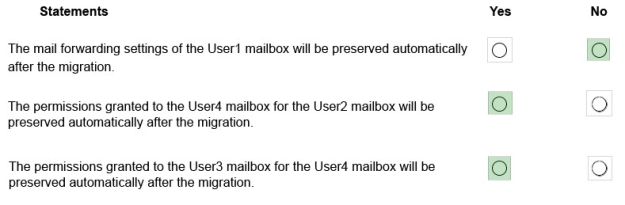
You have a Microsoft Exchange Server 2019 hybrid deployment.
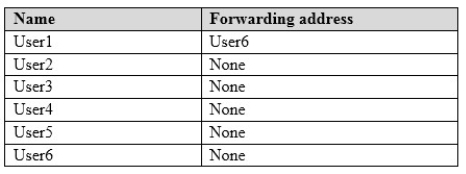
You have the on-premises mailboxes shown in the following table.
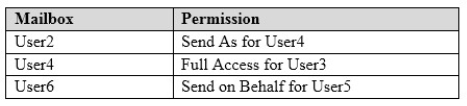
You add the mailbox permissions shown in the following table.
You plan to migrate the mailboxes to Exchange Online by using remote mailbox move requests. The mailboxes will be migrated according to the schedule shown in the following table.
Mailboxes migrated the same week will have their mailbox move requests included in the same batch and will be cut over simultaneously.
For each of the following statements, select Yes if the statement is true. Otherwise, select No.
Please wait while the virtual machine loads. Once loaded, you may proceed to the lab section. This may take a few minutes, and the wait time will not be deducted from your overall test time.
When the Next button is available, click it to access the lab section. In this section, you will perform a set of tasks in a live environment. While most functionality will be available to you as it would be in a live environment, some functionality (e.g., copy and paste, ability to navigate to external websites) will not be possible by design.
Scoring is based on the outcome of performing the tasks stated in the lab. In other words, it doesn’t matter how you accomplish the task, if you successfully perform it, you will earn credit for that task.
Labs are not timed separately, and this exam may more than one lab that you must complete. You can use as much time as you would like to complete each lab. But, you should manage your time appropriately to ensure that you are able to complete the lab(s) and all other sections of the exam in the time provided.
Please note that once you submit your work by clicking the Next button within a lab, you will NOT be able to return to the lab. Username and password
Use the following login credentials as needed:
To enter your username, place your cursor in the Sign in box and click on the username below.
To enter your password, place your cursor in the Enter password box and click on the password below.
Microsoft 365 Username: [email protected] Microsoft 365 Password: sc43@EMt^g%g
If the Microsoft 365 portal does not load successfully in the browser, press CTRL-K to reload the portal in a new browser tab.
The following information is for technical support purposes only: Lab Instance: 11024416
You need to create a public folder named Folder1 to meet the following requirements:
Any users in your organization must be able to send email to Folder1.
A user named Lee Gu must have Full Control permissions on Folder1.
To complete this task, sign in to the Microsoft 365 admin center.
Answer is in the explanation below.
Reference / correct answer:
See explanation below
You need to create a public folder, mail enable it and configure the permissions.
1. Go to the Exchange Admin Center.
2. Click Public folders.
3. Select Public Folder Databases. If a database exists, skip to step 6. If there is no public folder database, you’ll need to create one.
4. Click the plus (+) sign to add a new public folder database.
5. Give the new public folder database a name and click Save.
6. Select Public Folders.
7. Click the plus (+) sign to add a new public folder.
8. Name the public folder ‘Folder1’ and click Save.
9. Select the public folder. Under ‘Mail settings – Disabled’, select the ‘Enable’ link.
10. Click Yes to confirm.
11. Under ‘Folder Permissions’, select the ‘Manage’ link.
12. Click the plus (+) sign to add a user.
13. Click the Browse button to find and select Lee Gu.
14. In the Permission Level drop-down list, select ‘Owner’.
15. Click Save to add the user.
16. Click Save again to save the changes.
Question 6(Mixed Questions)
SIMULATION
Use the following login credentials as needed:
To enter your username, place your cursor in the Sign in box and click on the username below.
To enter your password, place your cursor in the Enter password box and click on the password below.
Microsoft 365 Username: [email protected] Microsoft 365 Password: b#nqvZG*0w*4
The following information is for technical support purposes only:
Lab instance: 10658557
You need to prevent email messages from being sent to the Internet if the messages contain content defined by the United States Health Insurance Portability and Accountability Act (HIPAA). The solution must be performed from the Exchange Online admin center.
To complete this task, sign in to the Microsoft 365 admin center.
Answer is in the explanation below.
Reference / correct answer:
See explanation below.
You need to configure a ‘data loss prevention (DLP) policy’.
1. Go to the Exchange Admin Center, click ‘compliance management’ then click ‘data loss prevention’.
2. Click the plus (+) sign and select ‘New DLP policy from template’.
3. Give the policy a name such as HIPAA-policy.
4. In the ‘Choose a template’ section, scroll down and select ‘U.S. Health Insurance Act (HIPAA)’
5. Ensure that ‘Enabled’ is selected for the policy.
6. Select the ‘Enforce’ option in the ‘Choose a mode for the requirements in this DLP policy’ section.
7. Click ‘Save’ to create the policy.
8. Select the new policy and click the edit icon (pencil icon).
9. Select ‘rules’ and untick the ‘Allow override’ option.
10. Click Save to save the changes.
Limited Time Offer – Save Now!
Don’t miss out — get full access at the best price.